Ce setup sous entend que vous avez déjà installé Google Chrome et Sublime Text.
L'objectif de cet Atelier est de reproduire cette page web.
landing sur votre bureaux. Glissez & déposez ce dossier dans Sublime Text window.index.html avec Cmd + S ou Ctrl + Sstyle.cssimagesindex.html pour l'ouvrir dans Chrome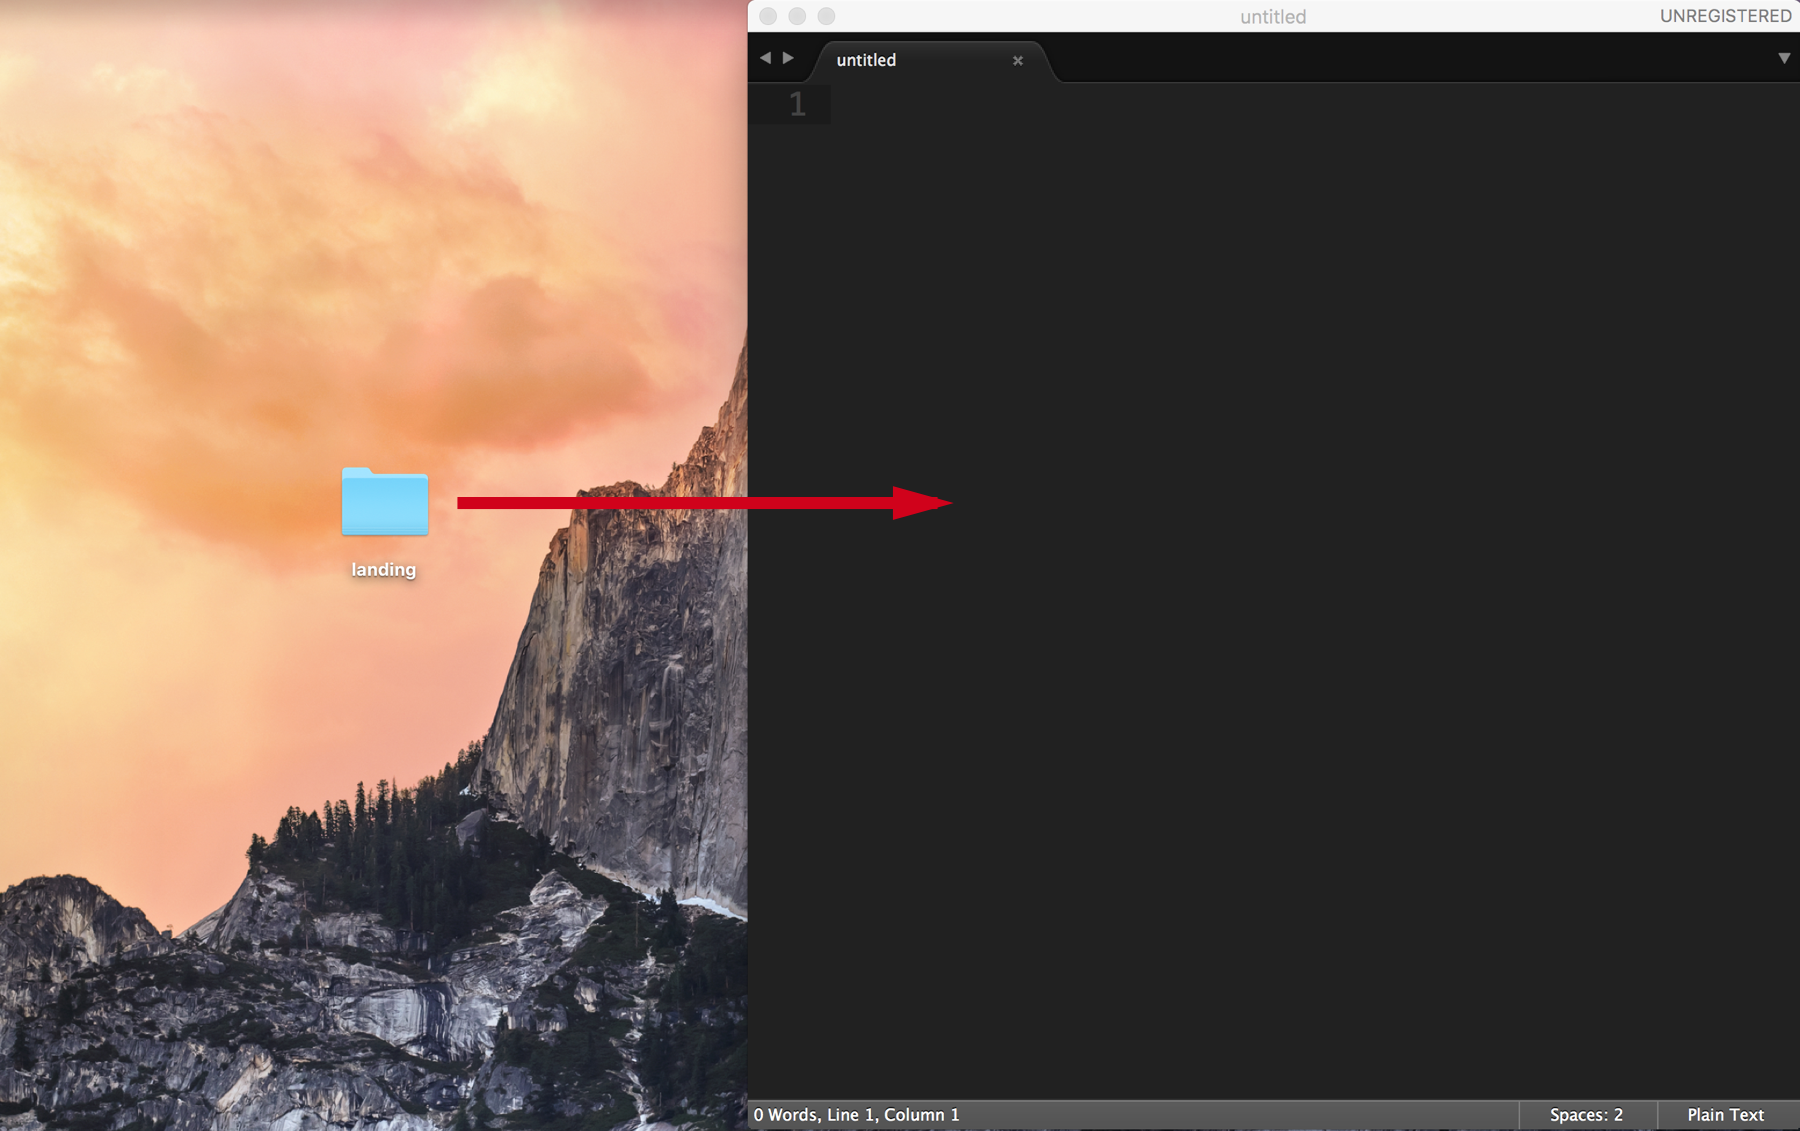
images


index.html<html>
<head>
<meta charset="utf-8">
<title>Atelier Google - Landing page</title>
</head>
<body>
<h1>Mon projet</h1>
<p>Punchline de votre projet de folie</p>
<a href="#">Contactez nous</a>
<img src="images/fast.png" alt="icon fast">
<h2>Rapide</h2>
<p>Nous vous livrons vite, vraiment <strong>très vite</strong>.</p>
<img src="images/trustable.png" alt="icon trustable">
<h2>Digne de confiance</h2>
<p>Vous pouvez nous faire confiance, <strong>vraiment</strong>.</p>
<img src="images/affordable.png" alt="icon affordable">
<h2>Abordable</h2>
<p>Nous adaptons notre prix à <strong>votre situation</strong>.</p>
<p>Landing page créée à l'Atelier Google Numérique de Nancy</p>
</body>
</html>
Lier votre stylesheet style.css dans la section head de votre HTML
<head>
  <link href='style.css' rel='stylesheet'>
</head>
Copiez/collez ensuite le code CSS ci-dessous style.css et modifier le pour qu'il soit à votre goût
/* style.css */
body{
  background: rgb(240,240,240);
  color: rgb(20, 20, 20);
  font-size: 18px;
  font-family: Helvetica, sans-serif;
  font-weight: lighter;
}
h1, h2, h3 {
  font-family: Courier;
  font-weight: bold;
}
h1 {
  font-size: 40px;
}
h2 {
  font-size: 24px;
  color: #6A71E1;
}
a {
  color: #6A71E1;
  text-decoration: none;
}
a:hover {
  text-decoration: none;
  color: black;
}
Enveloppez les différentes sections dans différentes div
<div>
  <h1>Mon projet</h1>
  <p>Punchline de votre projet de folie</p>
  <a href="#">Contactez nous</a>
</div>

<div>
  <img src="images/fast.png" alt="icon fast">
  <h2>Rapide</h2>
  <p>Nous vous livrons vite, vraiment <strong>très vite</strong>.</p>
</div>

<div>
  <img src="images/trustable.png" alt="icon trustable">
  <h2>Digne de confiance</h2>
  <p>Vous pouvez nous faire confiance, <strong>vraiment</strong>.</p>
</div>

<div>
  <img src="images/affordable.png" alt="icon affordable">
  <h2>Abordable</h2>
  <p>Nous adaptons notre prix à <strong>votre situation</strong>.</p>
</div>

<div>
  <p>Landing page créée à l'Atelier Google de Nancy</p>
</div>
id commme <div id="banner"> et <div id="footer">class comme <div class="card">class comme <div class="btn btn-blue">#banner{
text-align: center;
color: white;
padding: 150px 0px;
background-image: linear-gradient(-225deg, rgba(0,0,0,0.8) 0%, rgba(0,0,0,0.4) 50%), url("https://picsum.photos/1000/600?random");
background-size: cover;
background-position: center;
}
#banner h1 {
color: white;
font-size: 50px;
}
#banner p {
color: white;
opacity: 0.8;
font-size: 30px;
font-weight: lighter;
margin-bottom: 40px;
}
#footer{
padding: 30px;
background: rgb(30, 30, 30);
color: lightgrey;
}
.card{
background-color: white;
border-radius: 4px;
text-align: center;
box-shadow: 0 4px 6px rgba(50,50,93,.11);
padding: 18px;
margin: 16px 0px;
}
.card img {
margin-bottom: 20px;
height: 230px;
}
Ajoutez le stylesheet fontawesome dans votre head
<head>
  <link rel="stylesheet" href="https://use.fontawesome.com/releases/v5.5.0/css/all.css">
</head>
Ajoutez ensuite ceci dans le footer
<div id="footer">
  <ul>
    <li><a href="#"><i class="fab fa-youtube"></i></a></li>
    <li><a href="#"><i class="fab fa-facebook"></i></a></li>
    <li><a href="#"><i class="fab fa-twitter"></i></a></li>
    <li><a href="#"><i class="fab fa-github"></i></a></li>
  </ul>
</div>
Accompagné d'un peu de style CSS
#footer a {
  color: lightgrey;
  font-size: 30px;
}
#footer a:hover {
  color: white;
}
Liez le stylesheet de Bootstrap dans le head section de votre HTML avant le lien de votre stylesheet
<head>
  <meta http-equiv="X-UA-Compatible" content="IE=edge">
  <meta name="viewport" content="width=device-width, initial-scale=1">
  <link rel="stylesheet" href="https://stackpath.bootstrapcdn.com/bootstrap/4.1.3/css/bootstrap.min.css" integrity="sha384-MCw98/SFnGE8fJT3GXwEOngsV7Zt27NXFoaoApmYm81iuXoPkFOJwJ8ERdknLPMO" crossorigin="anonymous">
  <link href='style.css' rel='stylesheet'>
</head>
Jouez avec class="btn btn-primary" et class="list-inline", vos premières classes Bootstrap
<div class="container">
  <div class="row">
    <div class="col-12 col-sm-6 col-lg-4">
      <!-- div class="card" -->
    </div>
    <div class="col-12 col-sm-6 col-lg-4">
      <!-- div class="card" -->
    </div>
    <div class="col-12 col-sm-6 col-lg-4">
      <!-- div class="card" -->
    </div>
  </div>
</div>
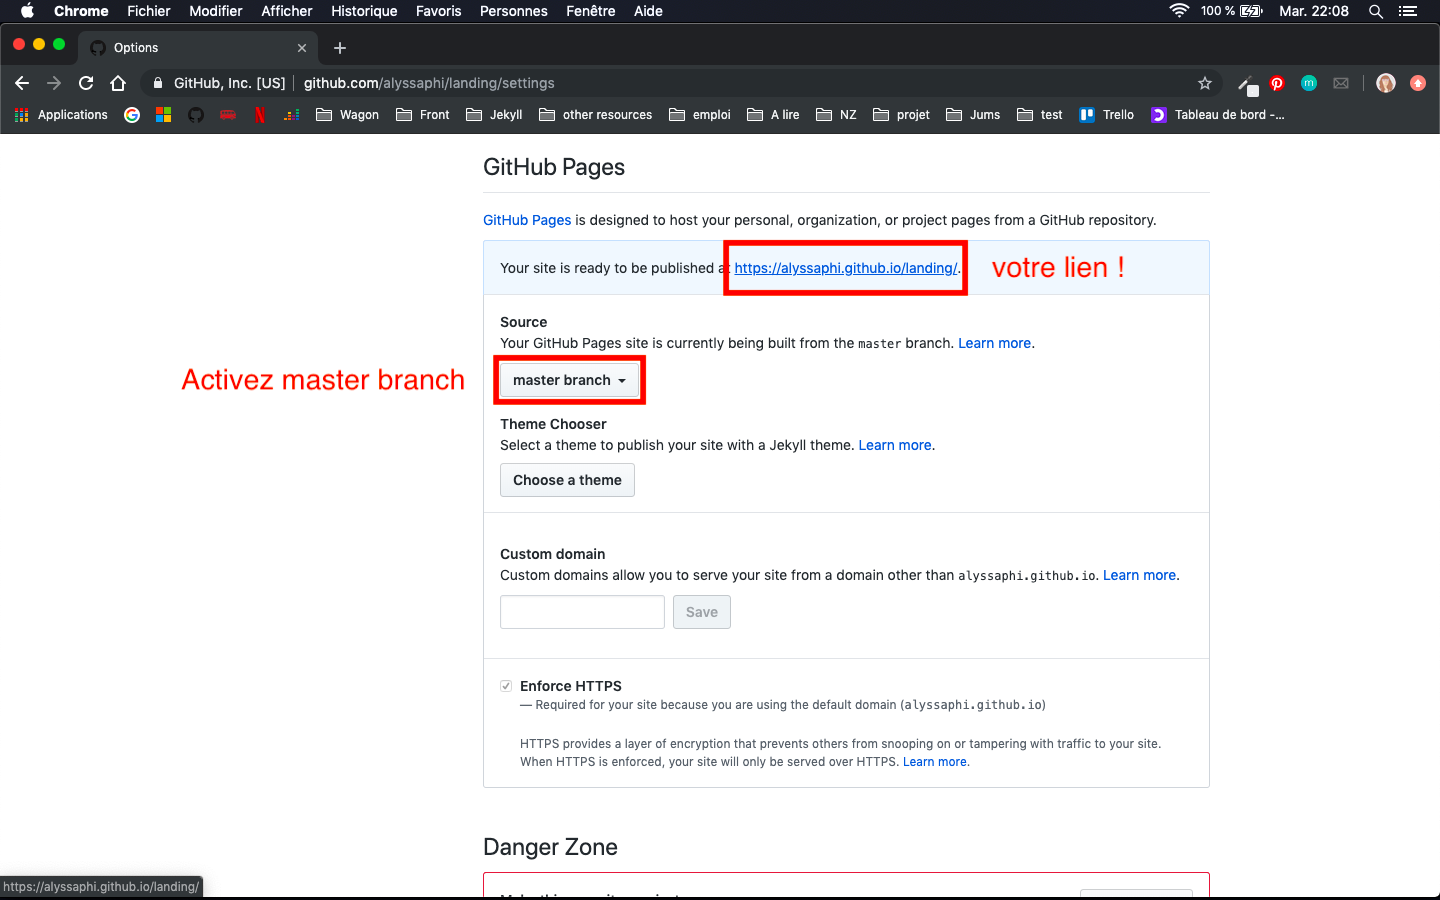
compte sur Githubrepository. Choisissez un nom pour votre projet, cochez la dernière case et cliquez sur Create repository
glisser vos fichiers dans le repo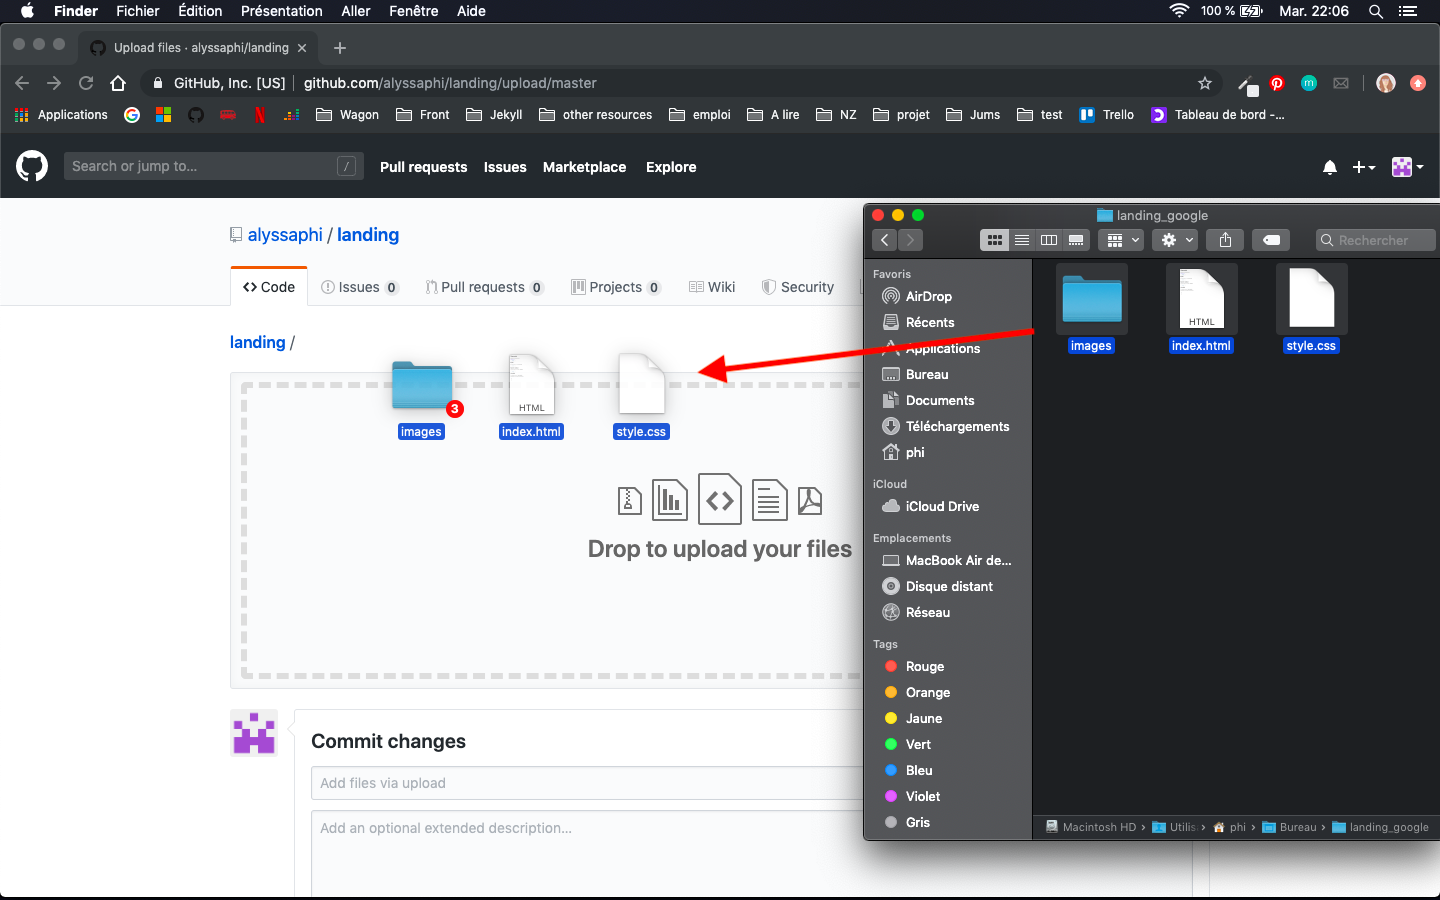
Settings. Descendez jusqu'à Github Pages. Puis choisissez master branchmagie opère. Votre url est créée